
13 Using the Ultimakers
In this chapter, we will cover:
- Starting prints on the Ultimakers.
- Cleaning the build plate on the Ultimakers.
- How to load filament into the Ultimakers.
- How to abort and troubleshoot printing problems.
Once you have finished slicing your model into a .gcode file using Cura, you can save it onto either the SD card or the USB designated to the printer. If you’ve forgotten how to create your .gcode, please refer back to Chapter 11
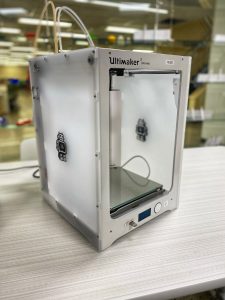
There are two different Ultimaker printers in the makerspace that can be used:
Ultimaker 2 Extended+: single PLA filament and extruder
Ultimaker 3: dual PLA filament and extruder OR single PLA filament and single PVA support filament
Printing with Ultimaker 2 Extended+
- Insert SD card into the Ultimaker slot
- Rotate the dial and click on “PRINT”
- Rotate the dial again and click on your desired file. It will begin once the print head heats up to over 200 degrees Celsius and the build plate heats up to 60 degrees Celsius; do not touch the print head or build while it is hot.
- Use tweezers to remove any excess filament that may come out while the print head is warming up (never use your hands)
- Once the print is complete, wait for the build plate to cool down and then remove the object

Printing with Ultimaker 3 Extended
- Insert the USB into the Ultimaker slot
- Rotate the dial and click on “PRINT”
- Rotate the dial again and click on your desired file and the print job will begin
- Once the print is complete, wait for the build plate to cool down and then remove the object
Cleaning the Build Plate
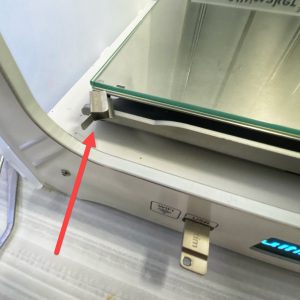
It is good practice to clean the Ultimaker build plate before and/or after you print. You can remove the glass of both the Ultimakers 2+ and the Ultimaker 3 build plates by opening the clamps that hold it in place. Clean build plate glass only when the print bed is cool. Once the clamps are open, slide the glass slowly out of the machine and lay it on a table. Apply glass cleaner or rubbing alcohol on the glass, and wipe it clean using a paper towel; these supplies can be found by the supply cupboards. Avoid holding the glass in your hands while doing cleaning, as the glass could easily slip out of your hands and break. Use the support of a table to do the cleaning to avoid breaking the glass and putting a machine out of use.
Once the glass is clean and dry, slide it back into the machine and move the clamps back in place so that the glass is secure.
Changing Filament
Before printing, locate the colour of filament identified when setting up the print in Cura, as this will avoid printing errors. Load it onto the specific printer you need and begin your printing. The video below illustrates how to change a filament on the Ultimaker 3. The same process can be used on the Ultimaker 2 Extended+.
Troubleshooting
While we always hope that our prints will run smoothly, there are times when the printers experience a problem and a print fails. Here are some common issues and how you can resolve them.
Aborting a Failed Print Job
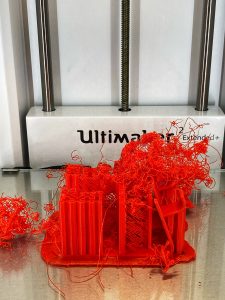
You will likely know if your print job has failed, but clear signs that a print has failed include:
- when the filament is printing all over the place and no longer building the model.
- if part of the model has been printed incorrectly or without proper supports
- if supports fail and the print is lopsided and ruined.
When prints fail, make sure to abort the print job.
To abort on both the Ultimaker 2+ and Ultimaker 3: rotate the dial and select PAUSE. The printing will pause, then rotate the selection wheel and choose TUNE>>Abort. It will ask you to confirm. Rotate the dial and select YES and the print will quit and the printer will begin the cool-down process.
If you are in a pinch, you can also turn the printer off using the power switch at the back. This is not ideal, but will work in an emergency.
Make sure to let the build plate cool before removing your failed print.
The filament is not adhering to the build plate
Sometimes when filament expires or goes bad it will not properly adhere to the build plate when printing the model. It is particularly important to watch your print at the beginning to ensure the filament is printing properly. If you are having difficulty with filament not adhering properly:
- Abort the job, and apply glue using a glue stick to the build plate and try printing again. Glue sticks can be found in the supplies drawers labelled ‘supplies’.
- Change the filament (see above) before reprinting.
Difficulty removing prints from the build plate
Sometimes the filament adheres really well to the build plate and it can be challenging to remove your object from the build plate without also damaging your newly printed model. Here are some suggestions on how to make this easier.
- Always ensure the build plate has cooled. The temperature change will cause the filament adhering to the plate to contract and the model will come off far easier when the glass is cold.
- Remove the glass from the machine with the model still on the glass (see cleaning the machine above). Place the glass on a table and retrieve some glass cleaner and paper towels from the supply cupboards. Spray a bit of glass cleaner on the glass around the base of the model so that the glass cleaner can run under the model. Usually, this process releases the model.
- If these earlier methods do not work, ask staff if they can put the build plate into the freezer for you for a little while. After a few minutes in the freezer, the warming and cooling process should cause the filament adhering to the plate to contract enough for the model to be released.
Test Your Knowledge
References
Image 1. Ultimaker. (2020). Removing the print [image]. Website: https://support.ultimaker.com/hc/en-us/articles/360011789500-Printing-with-the-Ultimaker-2-
Print Your Mind 3D. (2019, May 9). How to change your filament – Ultimaker 3. https://www.youtube.com/watch?v=c2XznbVFOBs&t=1s]
