
10 3D Model Design: Supports, Infill and Build Plate Adhesion
Before we demonstrate the specific steps needed to print your 3D model using Ultimaker Cura software, there are some fundamental concepts that are necessary to understand about 3D printing.
In this chapter, we cover
- Using supports for your model’s overhanging parts, including different types of supports
- What infill is and its different types
- Build plate adhension techniques
Overhangs and supports
As mentioned in the previous chapter, if the machine attempts to print a line of filament in a place where there isn’t a printed line of filament to support it, the printer will print into mid-air, resulting in a droopy mess.
The printers in the DSC should be able to print a 45 degree overhang without needing supports. If your model has an overhang that exceeds 45 degrees, you will want to consider enabling supports in the Ultimaker’s Cura software.
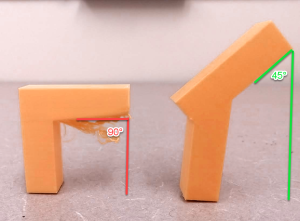
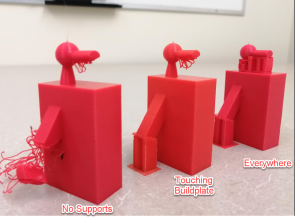
To protect against droopy messes, Ultimakers’s Cura software can generate supports that can be easily removed after printing. These supports are generated by 3D printing software, so you do not have to add supporting material into your model when designing.
Generally speaking, the Ultimaker printers are capable of generating two different styles of supports, depending on the needs of the models:
1. Touching Buildplate
When the “Touching Buildplate” option is selected, the printer will create supporting material for overhangs only if the supporting material can start on the print bed.
2. Everywhere
When the “everywhere” support placement option is selected, the printer will create supporting material for all overhangs, regardless whether the supporting material needs to begin on the model itself.
Infill
In order to save time and material, 3D printers will print the inside of a model using a resource-efficient pattern called infill.
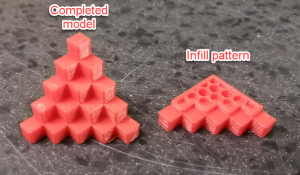
Infill can come in a variety of patterns, as seen below:
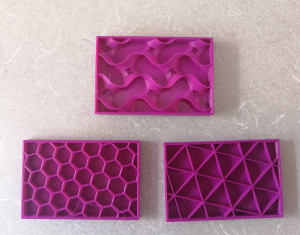
Importantly, the density of the infill can be determined during printer set up (which will be demonstrated in the next chapter). Infill density can range from 1% to 100%.
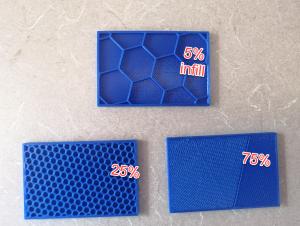
The lower the percentage, the more blank space within the model’s internal structure and the more fragile the model. The higher the percentage, the more material used to print the model’s internal structure and the less fragile the model.
It may be tempting to want 100% percent infill, but you probably don’t need as much infill as you think. Even printing with 5-10% infill creates a really solid, formidable model. A higher infill percentage will also take more time to print, and waste more filament than necessary.
As far as strength is concerned, increasing infill density results in diminished returns. A model with 50% infill will be 25% stronger than a model with 25% infill, but a model with 75% infill will only be 10% stronger than a model with 50% infill.
In short, we recommend using 5% infill for most projects.
Build Plate Adhesion
Depending on your design, your 3D model may need some help sticking to the print-bed. If there is no way to orient your model that provides a stable and wide contact point to the print-bed, you may have to consider one of these 3 techniques to help with the foundation of the printed model:
-
- 1. Skirt
-
- 2. Brim
-
- 3. Raft
Have your STL file ready
Although the makerspace computers are equipped with a variety of 3D design software, you will want to come to the makerspace with a complete STL file (with a .stl file extension) of the model you wish to print. You can come with the model on a USB stick, SD card, or saved in the cloud. The DSC will provide SD cards and USB keys to transfer files from the computer to the printers.
Test Your Knowledge
Simplify3D. (n.d.). Rafts, Skirts and Brims! Retrieved November 10, 2021, from https://www.simplify3d.com/support/articles/rafts-skirts-and-brims/
Tyson, Ed. (n.d.). How to Use 3D Print Infill Settings – Increase Strength, Save Filament. Retrieved November 30, 2021, from https://rigid.ink/blogs/news/optimum-infill
