
7.3 Relaying Information
This page discusses relaying information—
when to use it, what strategies to use, why it is important for communication, and how to employ the strategies.
When
Sharing information is a basic function of all professional roles. Professionals share information with individuals and/or groups of clients or colleagues, with other organizations, and with the community. Sharing information requires verbal and nonverbal communication skills, as well as critical-thinking skills. Information can be shared formally, such as a formal announcement to a team, or informally such as when your supervisor asks you for an opinion on a new technology. Information can also be shared through various channels, including face-to-face verbal communication, in writing, through visuals in a presentation, or online in a videoconference or social media post. No matter the audience, the formality, or the channel, the content of the message must be organized, concise, and clear if people are to receive our intended message.
What
On this page, we will explore two strategies for making our message in any situation organized, concise, and clear:
-
- Creating an outline
- Using the SMART structure
Why
Workplaces are complex—efficiency relies on effective communication and time needs to be used effectively. Each professional role has a job, and professionals can’t spend infinite amounts of time relaying or receiving information. We often don’t have a lot of time to receive the information that is necessary to make our decisions, and we don’t always know what information our audience needs to make theirs. Improving our communication skills to be organized, clear, and concise allows a team and organization to run effectively. We must train ourselves to continuously organize and structure the information we receive and deliver. Practising using the following strategies takes time and patience. However, after this practice, organized, concise, and clear communication will become something we easily do out of habit.
How
Strategy 1: Creating an Outline
Chances are that we have all developed some bad habits when it comes to relaying information. Swiping, thumb typing, or otherwise spewing words onto a screen or verbally to a colleague is just too easy. How often do you edit or refine your message before you hit Send? How often do you stop to organize and consider your thoughts before speaking to someone?
In the workplace, this method of delivering information is risky. Simply typing or saying whatever comes to mind produces rambling messages that frustrate or confuse the recipient. Time will often be wasted clarifying or revisiting ideas. Investing time in an outline will improve the clarity, flow, and brevity of your message. Outlining forces you to use critical thinking first, which helps you identify your core message and remove any unnecessary information.
On this page are three common approaches to outlining: 1) the top-down approach, 2) mind mapping, and 3) the bottom-up approach. None is better than the others; use whichever technique works best for you, but use one of them. In addition to the information you’ll include, you must also consider the time you have to deliver the message. Without an outline, your message is like a trip without an itinerary: fun for you, maybe, but maddeningly hard for your audience to follow.

1) Top-Down Approach
Top-down outlining works well when you already know the main subtopics you want to address. The top-down outline allows you to organize the ideas you know you need to include in your message. Ideas are arranged in a logical order, often numerically. There is always an introductory idea and a concluding idea. After arranging them in a logical order, you then develop each idea with supporting information.
An example of a top-down outline:
You are the Occupational Health and Safety representative in your department. Your supervisor has asked you to develop a 15-minute presentation for the next staff meeting to explain a new procedure to the team and will be asking you to present the same information in a one-on-one orientation with all future new employees. They would like you to explain the procedure, who they can contact for support, and when and why it’s needed. You use your critical-thinking skills to determine the following top-down outline (Table 7.2) for your 15-minute timeframe.
Table 7.2. Example of a Top-Down Outline
| Main Idea | Supporting Information | Time Allotted to Relay the Information |
| Introduction |
|
0.5 minutes
|
| Why we have a new procedure |
|
0.5 minutes
|
| What the new procedure is |
|
5 minutes |
| When to use the new procedure |
|
5 minutes |
| Sources for more information and support |
|
1 minute |
| Time for questions | 3 minutes |
2) Mind Mapping

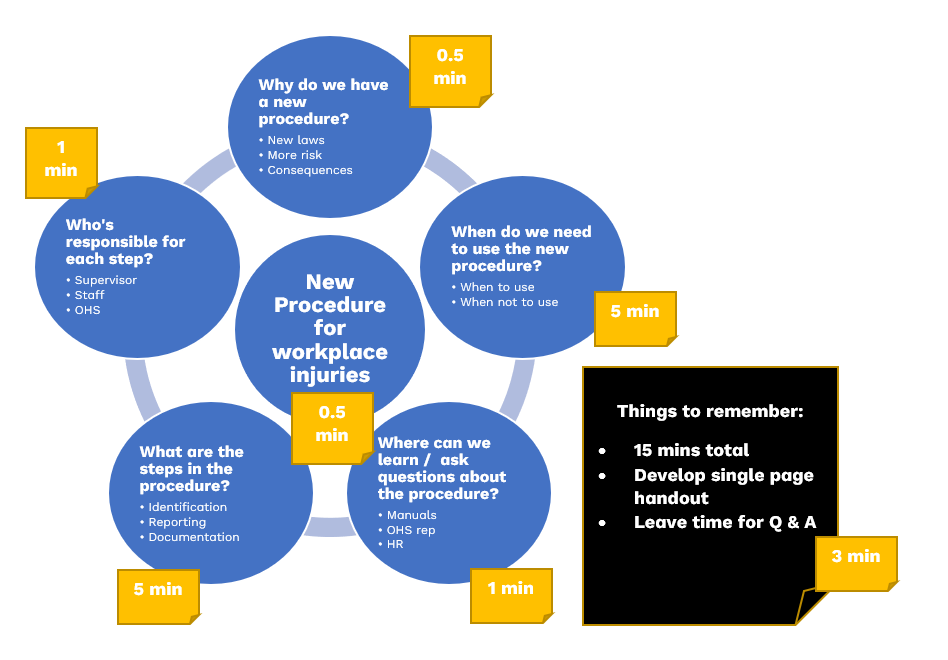
Mind mapping is great when you want to visually associate and/or explore multiple aspects of a topic or concept. If your ideas are not fully developed, or if you’re more of a visual thinker, you may prefer a mind map to a formal outline. After creating the mind map, you can then make decisions about the logical flow of ideas when presenting the information to your audience.
Steps to creating a mind map style outline:
- Write your main idea in the centre of a blank page. This strategy gives you room to branch out in all directions.
- Identify subcategories of the main idea and assign each one a keyword. Single words are more powerful and memorable. Choosing a single word forces you to think clearly and concisely.
- Draw branches from your central image with labels for the subcategories. Draw sub-branches for the conceptual components of each category. Use colour.
- Expand your subcategories with more branches and keywords. This will allow you to further refine your ideas.
- Draw curved branches. Straight lines feel mechanical, whereas curved lines feel organic. You want your mind map to feel like a living, breathing organism.
- Add images to the branches and sub-branches if you’re more visual. Pictures capture ideas more succinctly and creatively than words do.
Example of a mind map–style outline, based on the same scenario as above:
3) Bottom-Up Approach

Bottom-up outlining is essential when you have lots of information but need to impose structure and direction. A wonderful antidote for writer’s block, bottom-up outlining can be used when writing alone or in a group.
Follow these three steps:
- Brainstorm: Think about your idea and write down whatever comes to mind. Don’t hold back. Capture all the facts, keywords, concepts, stories, analogies, diagrams, and related ideas you can think of.
- Cluster: Next, look for patterns in your brainstormed list. Group related items together. Make clusters of meaning and stay open to new ideas. Notice any unusual associations between facts.
- Sequence: Finally, look at your clusters and sequence them in the way that will best achieve your purpose. Your sequence must be logical, and different organizing logics demand different sequences.
Table 7.3. Example of Bottom-Up Approach
| Brainstorm | Cluster (words in parentheses indicate clusters) |
Sequence |
|---|---|---|
| We have had new safety policies come into effect at the end of this month. Part of the new safety policies is a new procedure we have to follow when a person gets hurt at work.
Steps to the procedure (Identification, Reporting, Documentation). The company is responding to increased safety risks in the post-pandemic era. The new safety policies have changed because new laws have been passed. When and when not to use the procedure Risks of not using it. Staff can review the Policy and Procedure manual or talk to the Occupational Health and Safety representative (me) and the Human Resources department. 15 minutes to deliver the information above. Suitable for delivering to individuals or groups. Include time for questions and discussion.
|
New safety policies will come into effect at the end of this month. Part of the new safety policies is a new procedure we need to follow when a person gets hurt at work. (Introduction)
The new safety policies have changed because new laws have been passed. (Why) Steps to the procedure (Identification, Reporting, Documentation) (What) The company is responding to increased safety risks in the post-pandemic era. (Why) When and when not to use the procedure. (When) Risks of not using it. (When) Staff can review the Policy and Procedure manual or talk to the Occupational Health and Safety representative (me) and the Human Resources department. (Sources for staff support) 15 minutes to deliver the information above. Suitable for delivering to individuals or groups. (Considerations) Include time for questions and discussion. (Considerations)
|
1) Introduction
New safety policies come into effect at the end of this month. Part of the new safety policies is a new procedure we need to follow when a person gets hurt at work. (0.5 minutes) 2) Why we have a new procedure
(0.5 minutes) 3) What the new procedure is
(5 minutes) 4) When to use the new procedure
(5 minutes) 5) Sources for more information and support
(1 minute) 6) Time for questions (3 minutes) |
After you clarify and arrange your content using one of the above outlining strategies, refine your message by using the next strategy, the SMART structure.
Strategy 2: Applying the SMART Structure
In previous classes, you may have learned a three-part approach to writing an essay to deliver your ideas: introduction, body, and conclusion. In the workplace, after creating the outline for your information, use the SMART structure to determine how you will deliver the information to your audience. The SMART structure modifies the essay-writing approach to create a more workplace-oriented outline designed to engage the audience to attend to the information being shared. The SMART structure expands the “introduction” part by specifying three subparts: an attention getter, a key point, and an agenda. Then the body and conclusion are renamed to create an easily remembered acronym for the strategy: the SMART structure.
SMART is an acronym for …
- Story: Why should your audience spend precious time and attention on your message? This is the first question you must answer. Hook your audience by starting with a story, a shocking statistic, or a surprising observation, but keep it brief and make it relevant—no gimmicks, please. If you tell the story at the start and never mention it again, it’s gratuitous. Some communicators “bookend” their message by returning to their opening story at the end of the message. This creates symmetry and closure. Better still is to incorporate multiple touchpoints to your story throughout the message.
- Main idea: Be bold and deliberate by stating your key point up front. Don’t “bury the lead,” a phrase journalists use when the central idea of the article appears anywhere other than the first paragraph. In professional settings, the audience wants the core message immediately, especially when it’s a recommendation.
- Agenda: An old public-speaking tip states that you should “tell ’em what you’re gonna tell ’em” at the beginning of a speech. This concept is crucial to professional communication. Your agenda previews the body of your message—usually in one sentence—and prepares the reader for the main points you’re going to make.
- Reasons: Your reasons are the meat of your message—your main points supported by solid evidence and logic. Keep in mind the Rule of Three (see Table 7.4 below for an example) to ensure that your message is simple and memorable.
- Task: Professional communication always ends with a task. What should the audience do based on your message? Your closing should not only summarize the information, but also identify next steps, if appropriate.
The table below uses the same example as above to create an outline using the SMART structure.
Table 7.4. Scenario Example with SMART Structure
| Story | In the last three years, there has been a 150% increase in absenteeism, and we have had no way to properly document it. This leads to staff and supervisors not being able to account for lost wages and a decrease in services. This can impact our jobs and client services. There are now new laws in place, and therefore, new safety policies will come into effect at the end of this month. Part of the new safety policies is a new procedure that we need to follow when a person gets hurt at work.
(1 minute) |
| Main idea | Starting at the end of the month, there will be a new three-step process for documenting workplace injuries.
(0.5 minutes)
|
| Agenda | I’m going to explain the procedure and staff responsibilities for implementing the procedure.
(0.5 minutes) |
| Reasons |
(9 minutes) |
| Task | To increase our efficiency and ensure staff well-being, all staff need to do the following:
(4 minutes) |
In summary, don’t leave your message at risk of not being received and your audience wondering hopelessly about the meaning of your message. Create an outline to organize and sequence your ideas.
Use the SMART structure to build your outline and guide the composition of your message:
-
- Hook your audience with a STORY.
- Clearly and powerfully state your MAIN IDEA.
- List your AGENDA.
- Develop your REASONS.
- Close with your audience’s TASK.
Relating Theory to Real Life
Imagine your future workplace and professional role.
- Choose a common topic you might need to share information about with co-workers, clients, or other important partners in your line of work
- List your audience.
- Choose the environment (setting) in which to share your information
- Create your outline using one of the three styles.
- Using the SMART structure, plan how you will deliver the necessary information and message.
- Practise your presentation with a colleague, friend, or family member, and/or record yourself on your phone and watch it back. Gather the following feedback;
- Was the information organized?
- Was the message concise?
- Was the delivery engaging?
- Have the person “tell” the information back to you based on what they heard. Did they retell all the important points? Do they know what task(s) to complete?
Attribution
Unless otherwise indicated, material on this page has been reproduced or adapted from the following resource:
Thomas, L., Haupt, J., & Spackman, A. (2017). Management communication. The Marriott School at Brigham Young University. https://open.umn.edu/opentextbooks/textbooks/management-communication, licensed under CC BY-SA 4.0, except where otherwise noted.
Image Credits (images are listed in order of appearance)
Top-Down Approach by L. Thomas, J. Haupt, & A. Spackman, the Marriott School at Brigham Young University, CC BY-SA 4.0
Bottom-Up Approach by L. Thomas, J. Haupt, & A. Spackman, the Marriott School at Brigham Young University, CC BY-SA 4.0
Mind map outline by S. James, NorQuest College, CC BY-NC-SA
Mind Mapping by L. Thomas, J. Haupt, & A. Spackman, the Marriott School at Brigham Young University, CC BY-SA 4.0
