
4 Starting your Pressbook and Planning Templates
The strength and effectiveness of a Pressbooks publication for students, instructors, faculty, and staff begins from the initial planning process and involves thinking outside the box from traditional books. By utilizing the functions and plug-ins within Pressbooks, your book can become more interactive, visual, and colourful. A well-organized book is beneficial for all, but especially for individuals using accessibility tools.
As with traditional scholarly publications, your book will require peer review by at least two subject-matter experts and revision by a copy editor.
Considerations of accessibility, equity, and diversity should be at the forefront as you plan your publication. Learners should be able to “see themselves” accurately in the material presented while being exposed to a variety of perspectives, experiences, and identities. Before you embark on your project, we encourage you to review the following:
- Accessibility Checklist
- Criteria for Peer Review
- The Rubric for Equity, Diversity and Inclusion
- Video: What Does It Mean To Decolonise the Curriculum?
4.1 Pressbooks Publication Planning Templates
To assist you in planning your Pressbooks OER, NorQuest College has developed several templates to guide you through the process. These include:
- A Pressbooks OER Book Design Map Guide
- A Pressbooks OER Chapter Planning Guide
Examples of these templates are provided at the end of this guide.
4.1.1 Pressbooks OER Style Sheet
The Style Sheet can be used to help guide you in determining the look, structure, citation style, and language of your Pressbooks publication.
4.1.2 Graphics and Media Attribution Tracker
The Graphics and Media Attribution Tracker provides a space to record the information and hyperlinks associated with any multimedia you will be adding to your book. This includes the title, author, source, and licensing information of these items. As Pressbooks publications are open educational resources, it is strongly suggested that any multimedia used with the book is Creative Commons (CC) licensed and proper attribution for their use is provided.
When you are uploading your images and other media to Pressbooks, these items will be uploaded to the Media Library within your book. A list of the different file formats that can be uploaded to the Media Library can be found here. When you upload an image to the Media Library, you should also enter its licensing information, alternative text, and caption on the Edit Media page. This ensures that proper attribution and citation of media is included in your book. See Figures 6 through 9 below for more details.
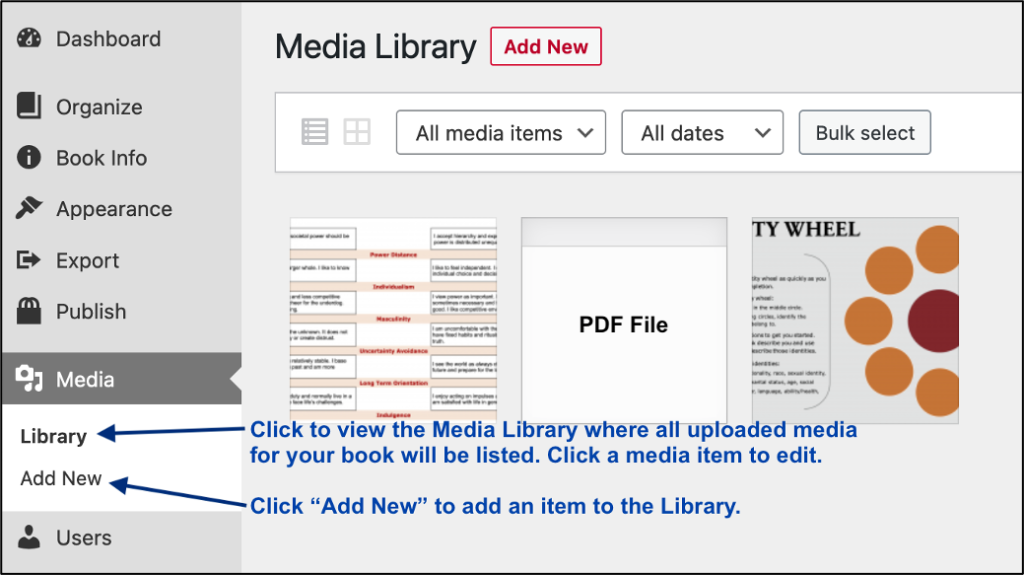
Figure 6. Media Library with three media items uploaded and displayed in grid-format
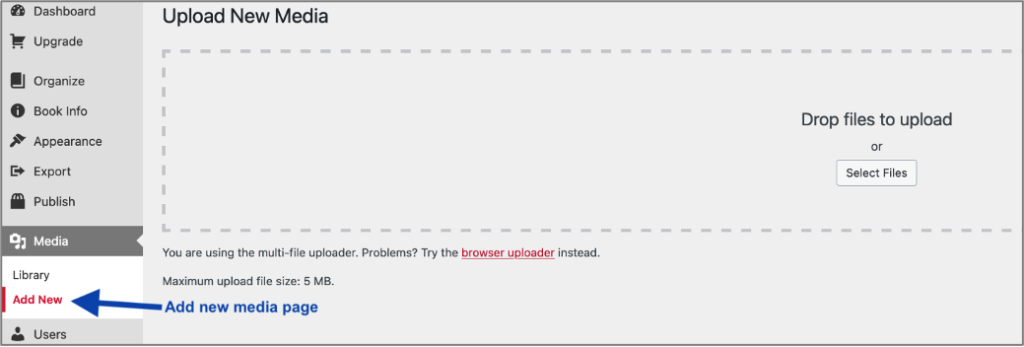
Figure 7. Select Add New for the Upload New Media page to add media file(s) to the Media Library
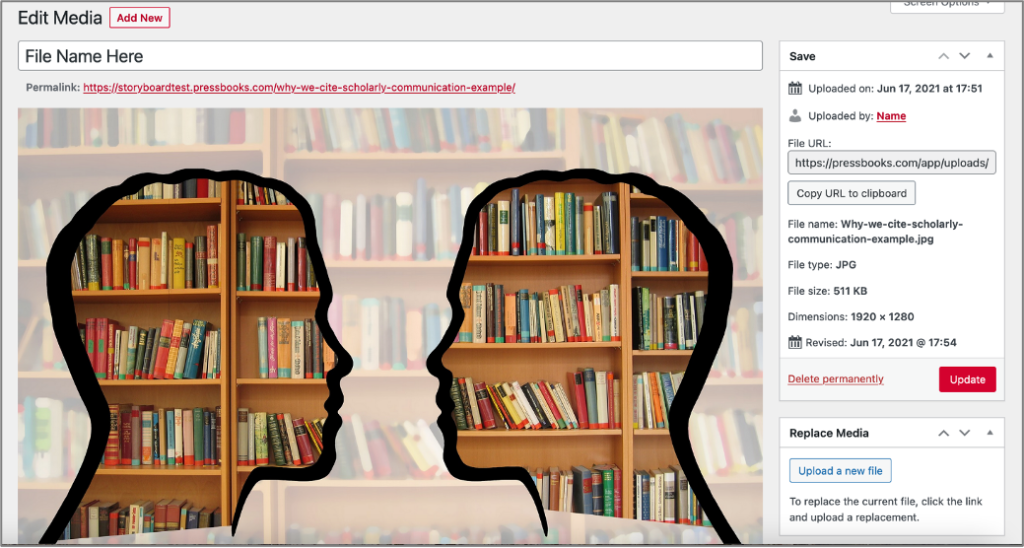
Figure 8. Edit Media page shows after uploading an image file (top half of page shown here)
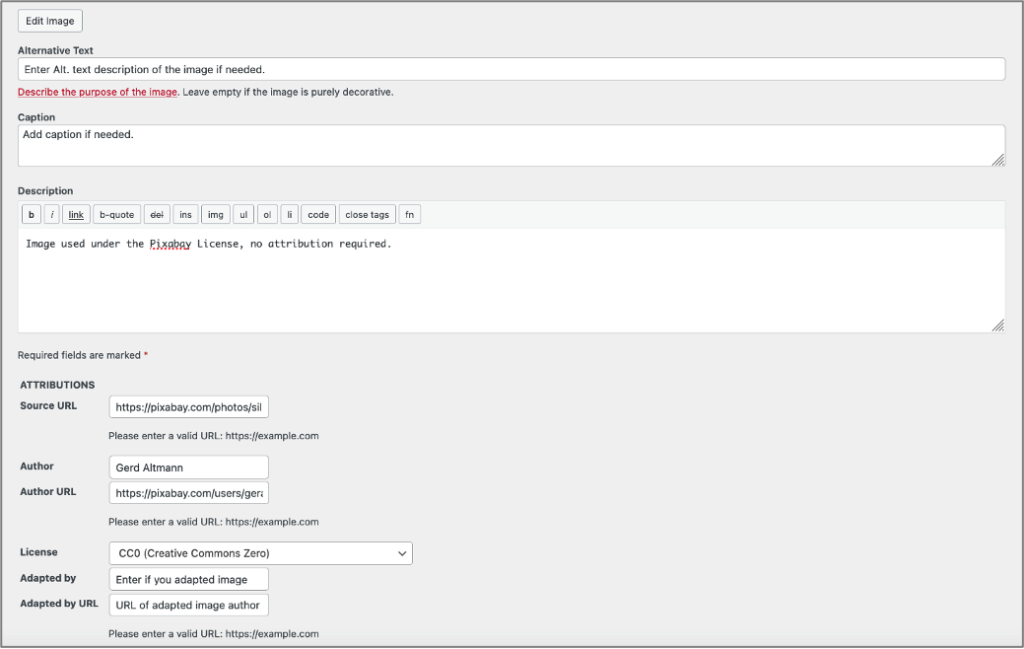
Figure 9. Edit Media page continued from Figure 8. Licensing information, alternative text, and captions can be added here
Embedded videos are not uploaded to the Media Library. Instead, they are added within the Edit Chapter Visual Editor page by selecting the Add Media button (under the chapter title field), then Insert from URL (last option listed in the left-hand column). See Figure 10 below for these steps.

Figure 10. Embedding a video from a URL in the Chapter Visual Editor
You may find that certain multimedia under CC licensing is not always available within different disciplines. In these cases, it is best to consult with the OER team for guidance on using copyrighted materials at oer@norquest.ca.
4.1.3 Pressbooks OER Book Design Map Guide
The Pressbooks OER Book Design Map Guide will assist you in planning out your book. At this stage, the content of the book will be planned more broadly to provide an overall picture of the book’s details, general learning outcomes, key terms, learning activities, and related resources. This template can be adjusted as needed, depending on the purpose of the book and its audience.
If you are developing an OER textbook, the resulting publication is intended to be a resource used within a course, just as you would use a traditional textbook. As your Pressbooks textbook will be an open educational resource, it will be available for adoption or adaptation by other institutions and faculty members. Therefore, you may want the activities to be more open, rather than being prescriptive in their use. An example could be having a discussion point allowing the instructor to choose how their students will interact with the posed question(s), rather than directing the reader to a particular discussion board.
Any H5P activity assessment intended to go towards a student’s grade should not be included within the OER textbook unless the publication is linked with a course in an LMS (such as Moodle). Alternatively, general instructions for an assignment could be provided within the textbook, but more in-depth details and how to submit the assignment should then be provided within the course syllabus.
4.1.4 Pressbooks OER Chapter Planning Guide
The Pressbooks OER Chapter Planning Guide template is intended to be used following the Book Design Map Guide template to fully plan out all elements for the chapters and sections in your book.
Within Pressbooks’ organizational structure there are three main Parts: Front Matter section, Main Body, and Back Matter section. When writing the content of your book, you can use the Chapter Planning Guide template to write the content for all Parts, Chapters, and sections in your book. The template represents one chapter or section. So, to create the whole book and all its chapters and Front and Back Matter sections, you can either:
-
- Duplicate the template within the same document, so that the book’s content is all together, or
- You can use separate template documents for each chapter or section.
Either option will work if all Chapter Titles or section titles are formatted using Heading 1, while Heading 2 is used for the main headings within each chapter or section. All subsequent headings follow that format as well. The Chapter Planning template has already been formatted in this way to help in this process.
You have a few options for getting the content of your book into Pressbooks, which are by:
-
- Manually adding Parts and Chapters to the Organization page, and then copy and pasting the content from the Chapter Planning template into each Chapter’s Visual Editor (see Figure 11), or
- You can import the completed Chapter templates with the developed content of your book. Chapters will automatically be created from Heading 1 in the template. During the importing process, you will be able to dictate which of the three Parts each of the imported chapters will fall under. More on this later in the guide.
- Pressbooks allows Word, ePUB, or HTML file formats to be imported.
After your content is in Pressbooks—whether you are copying and pasting from the Chapter Planning template or importing it—you will need to adjust the Heading levels within each chapter. Because Heading 1 has been used for the chapter titles, the main heading will need to be adjusted and bumped up a level from Heading 2 to Heading 1 in each chapter in the Chapter Visual Editor. Any other headings used will also need to be bumped up a level. Pressbooks has formatted headings up to Heading 6.
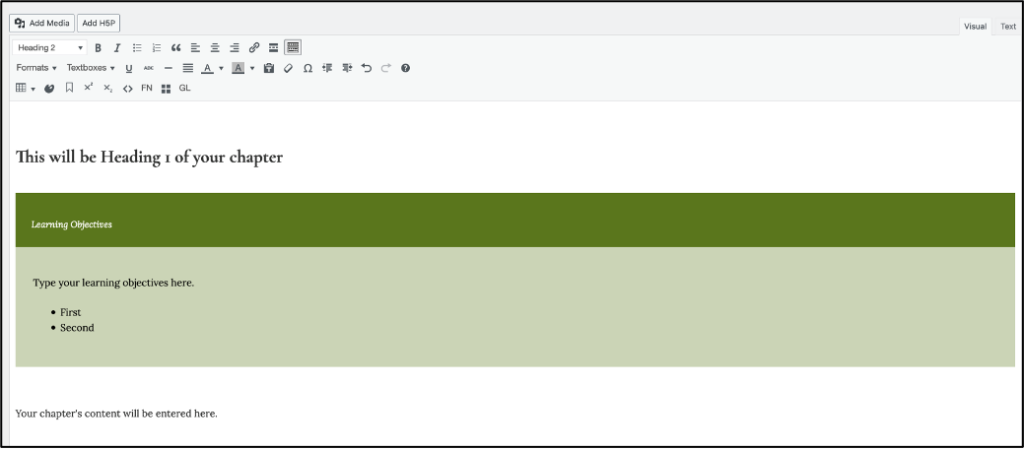
Figure 11. Chapter Visual Editor with headings, content, and a Learning Objectives textbox added
4.2 Alternative Book Organizational Structure Option
An alternative option to limit scrolling for readers is to adapt the default organizational structure, so that it focuses on Chapters and Heading 1, rather than Parts and Chapters. To do this, you will treat the Main Body Part as being at Chapter level instead. This means that within the body of your book each Part represents a Chapter and what were originally Chapters within the Main Body, become Heading 1 (H1) within your chapter. So, each Heading 1 (H1) will have its own section in the organizational structure (see Figures 13–15 below for a visual representation of this adaptation).
Front Matter and Back Matter will remain the same, as they are permanent features and cannot be adjusted in this way.
If you choose to adapt the organization of your book and to import it using the Chapter Planning template, then you should use separate Chapter Guide templates for each Heading 1 (H1) within each chapter. Otherwise, you can copy and paste the content to reflect this adaptation instead.

Figure 12. Book organization page’s upper-banner menu with labels
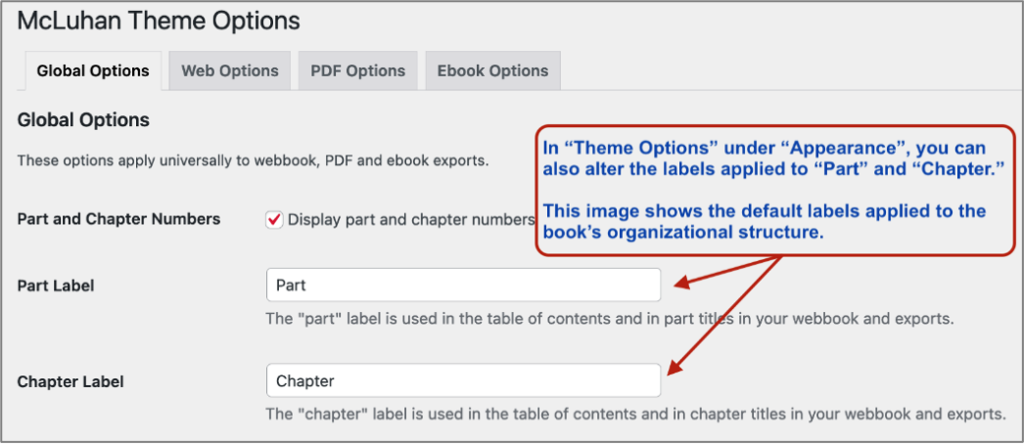
Figure 13. Two organizational structure options for your book: Part & Chapter vs. Chapter & Heading 1
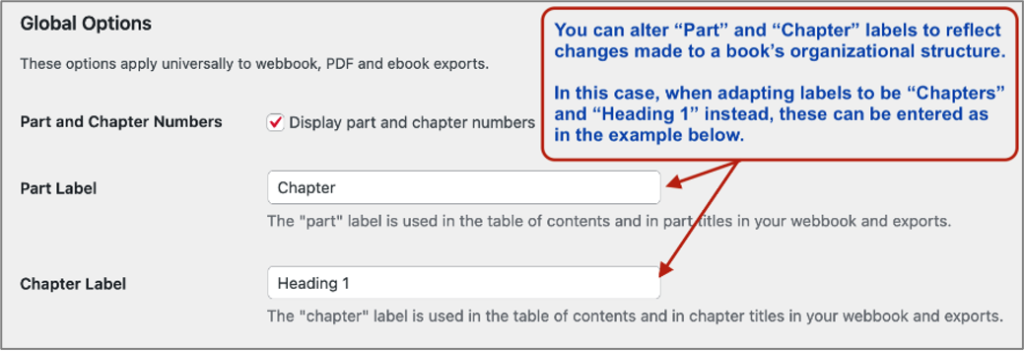
Figure 14. Appearance Global Theme Options: Part & Chapter Labels for default organizational structure
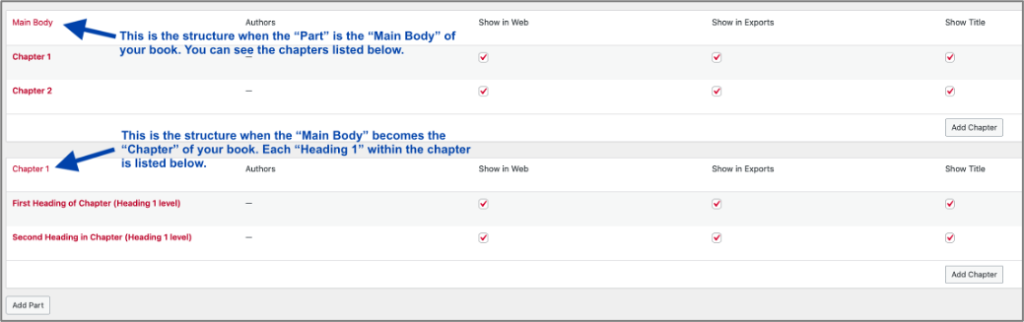
Figure 15. Appearance Global Theme Options: Part & Chapter Labels adapted using Chapter and Heading 1 for structure
4.3 Glossary List and Terms
Potential Front Matter and Back Matter section lists are provided in the Pressbooks OER Style Sheet. One page type that you could include in your book’s Back Matter is a glossary list. By selecting Glossary under the Back Matter Type on an Edit Back Matter page (see Figure 16 below), the list will be automatically generated from the terms added under Add Glossary Term (see Figure 12 above), or in the Chapter Visual Editor’s glossary function.
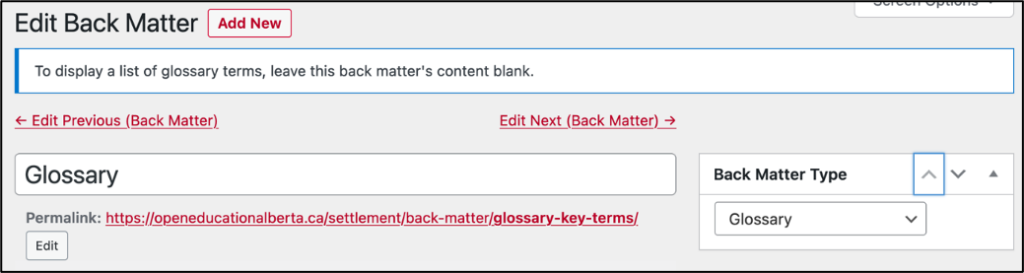
Figure 16. Edit Back Matter Page with Glossary Back Matter Type selected
4.4 H5P Plug-In
The H5P plug-in available in Pressbooks provides an excellent opportunity for different learning activities and interactive content throughout your book. To learn more about the different options available for H5P click here.
H5P activities or media files each have their own Library in Pressbooks. So, these can be planned within the Chapter Planning Guide template and then created or imported separately to their specific Library.
4.5 Importing the Pressbooks Templates (& Other File Types)
Figures 17 through 20 below take you through the steps for importing a document containing your book into Pressbooks. This example shows how the Pressbooks Chapter Planning Guide template is imported, but other file types would be similar if they are formatted correctly (i.e., Heading 1 for chapter titles, Heading 2 for main headings). Figure 18 below shows how you would dictate where each chapter should be located within your book—Front Matter, Main Body, or Back Matter.
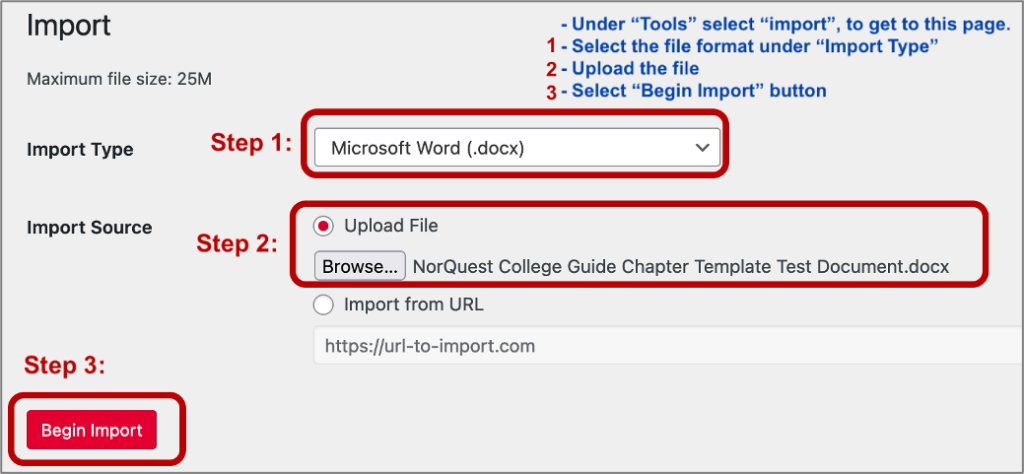
Figure 17. Tools: Import page steps for importing your book with a formatted document
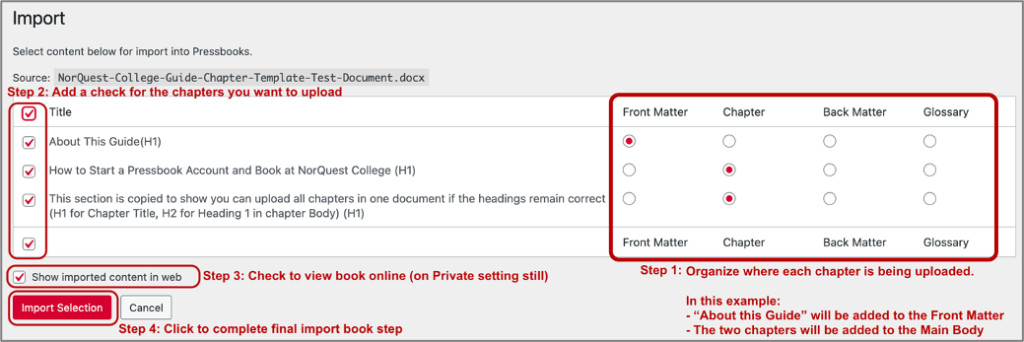
Figure 18. Second Import page with list of recognized Heading 1 Chapter Titles and organizational Part options
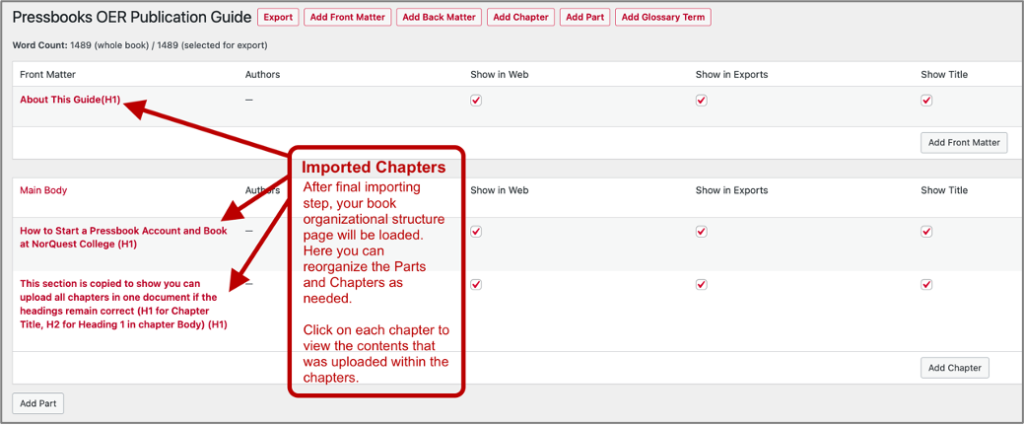
Figure 19. Uploaded chapter template now imported to the book organizational structure page
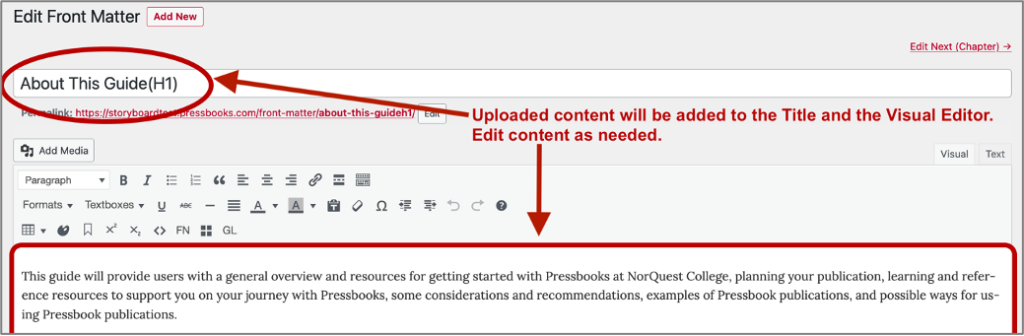
Figure 20. Chapter Visual editor page for the Front Matter chapter titled About This Guide
Note: If you are adapting the organizational structure from Parts & Chapters to Chapters & Heading 1, you will still import the same way. All Chapter Planning templates using the Heading 1 adaptation will all be imported to the Chapter section in Figure 18. Parts with the chapter titles will need to be added to the book organizational structure page and then the Heading 1 files can be reorganized in their correct chapter and order.
4.6 Importing a Pressbooks Publication from a Repository
If you are looking to adapt an existing publication from a Pressbooks repository, rather than creating a new book, your process for getting content into Pressbooks will look a little different.
The Pressbooks Publication Planning Templates can still be utilized when you are adapting a publication. As you will be taking content for part or all your book from the original source, you can use the templates to identify and record the metadata, structure, content, activities, media, etc. that you will be adapting and/or adding. This could also be useful as you should note the changes you have made from the original source within your book. Some publications include these notes in their book’s long description on the home page. You could also create a section in the Front Matter to record this information.
You should be able to access the downloadable file of the book you are adapting from the original source’s home page in the top banner under the book cover (see Figure 21 below). The best file format to use for this is Pressbooks XML. Once you have downloaded the file and a space for the book has been created in your account by the OER team, you can then import that file (see Figure 22).
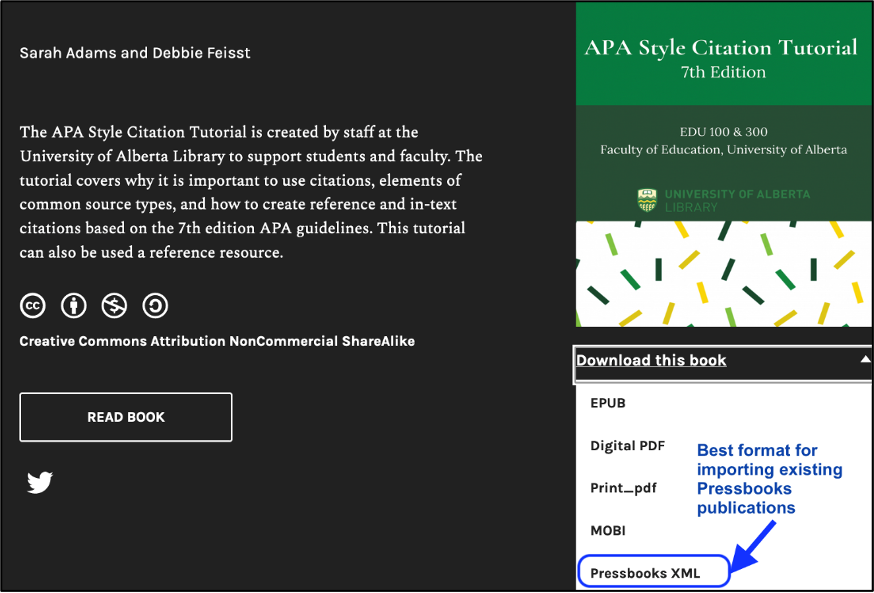
Figure 21. Top banner with downloadable files available, including PressbooksXML
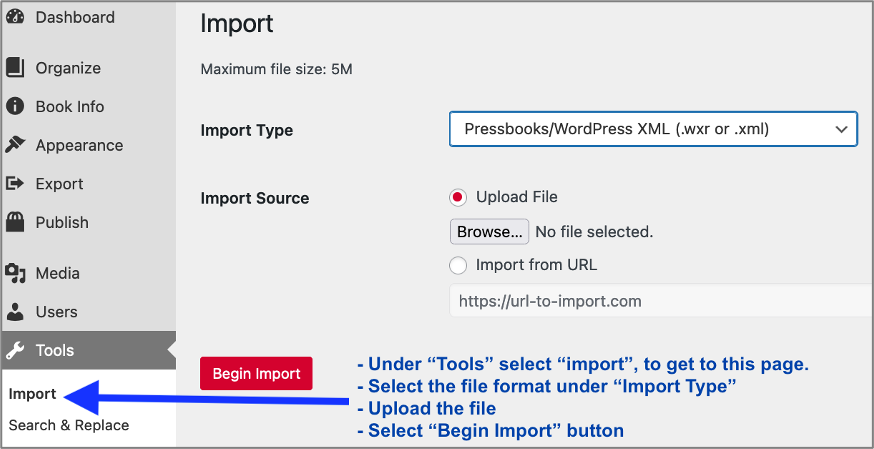
Figure 22. Import page directions for importing a file to your book showing Import file as Pressbooks XML
4.7 H5P Library
H5P activities within your book can be either created by you or you can use an existing H5P. If you are using an H5P from another book, they will need to be downloaded individually and then uploaded into the H5P Library to be inserted in your book. The two options for getting H5Ps into your book are shown in Figures 23–26 below.
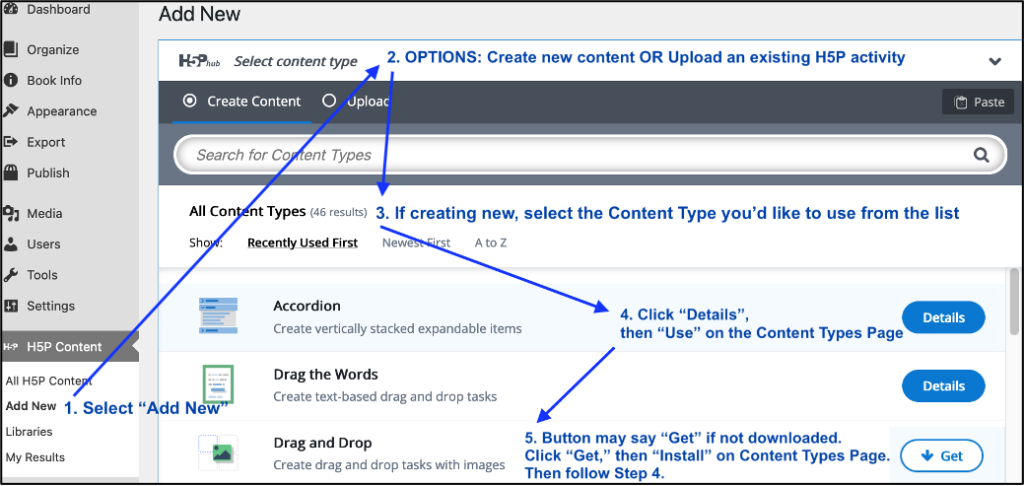
Figure 23. H5P Library directions for Add New H5P activity, either by uploading or creating new
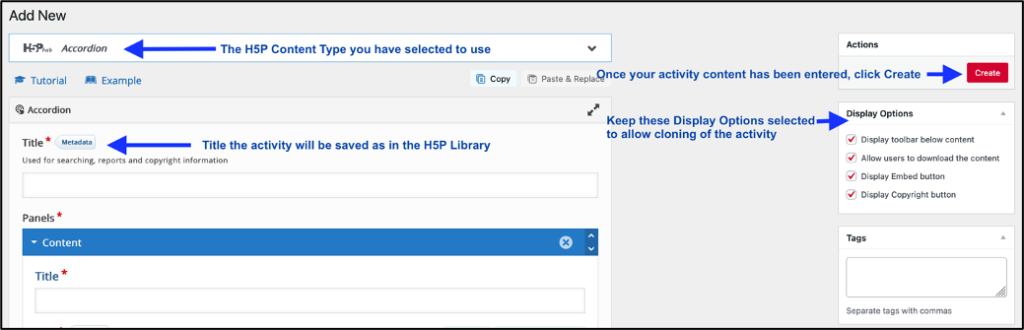
Figure 24. Add New H5P page and directions for creating a new H5P activity
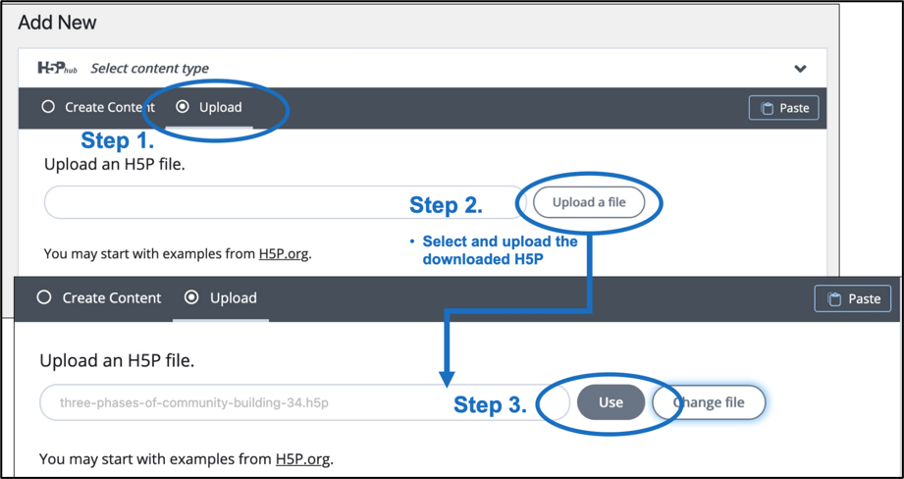
Figure 25. Add New H5P page showing steps 1, 2, and 3 for uploading an existing H5P file
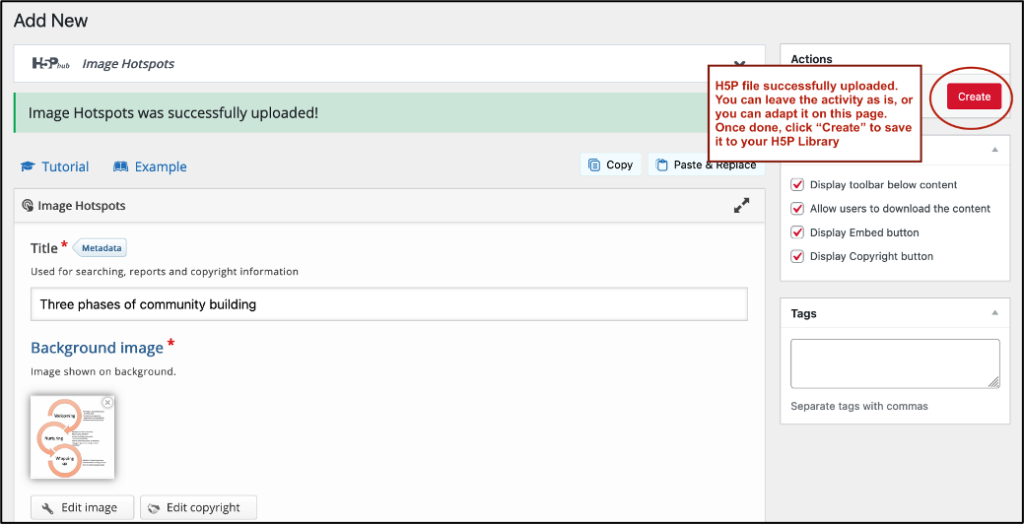
Figure 26. Add New H5P upload confirmation of an existing H5P file—after successful import the file’s H5P editing page automatically opens
4.8 Book Theme, Theme Options, and Custom Styles
Under Appearances on the Pressbooks Dashboard are options for customizing your book. The default typeface theme for Pressbooks EDU is McLuhan, but there are other themes available, which you can find here. You can also change the Header font and Body font under the Web Options from a small selection. If you would prefer to request another theme be added to your book, contact the OER team at oer@norquest.ca.
Along with the main theme default settings, there are different options available for each of the different file formats that your book may take. Some are shown in Figure 27 below, but we encourage you to play around with the different settings and see what you prefer for your book.
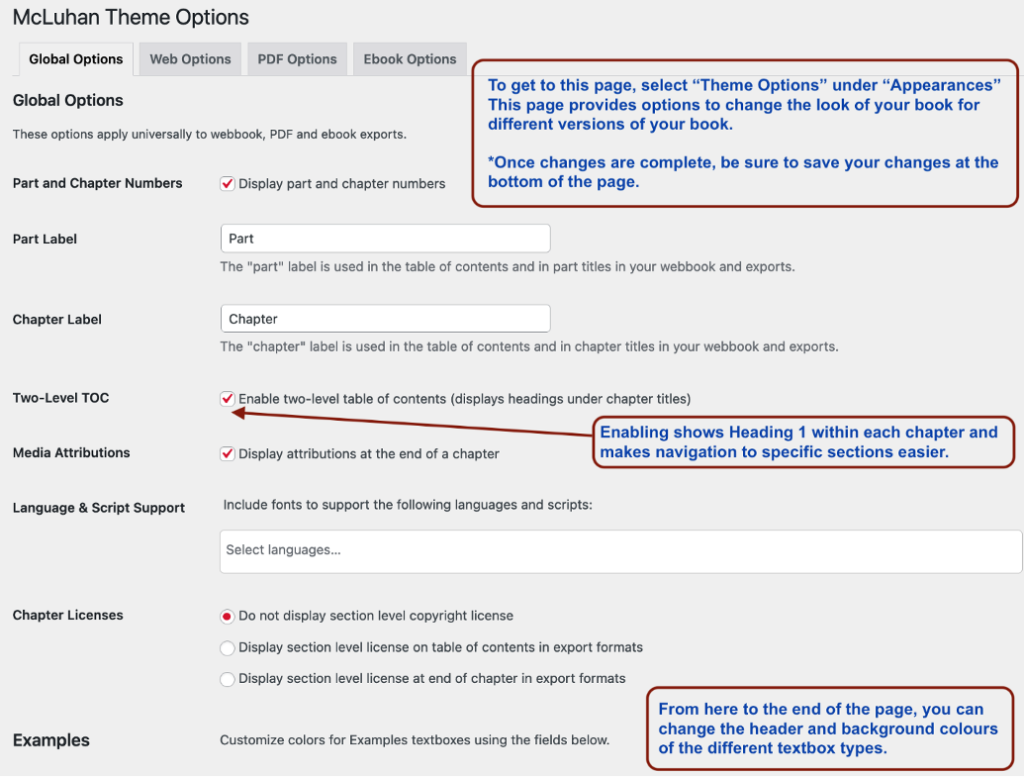
Figure 27. Appearances: Theme Options, Global Options page shown with highlighted details
If you are comfortable using CSS or researching CSS, you can also use it to customize your book even further. Any CSS that is entered will override the default theme CSS (see Figure 28 below).
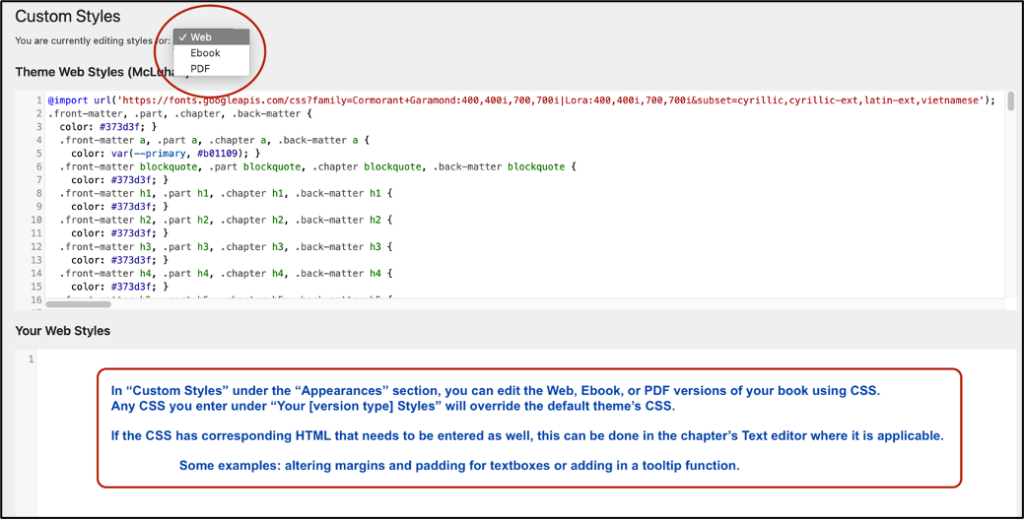
Figure 28. Appearances: Custom Styles page with details on adding CSS to customize a book
4.9 Peer Review and Creating Downloadable Files
Once you have completed the creation of your book and you are ready for publishing, contact the NorQuest College OER team who will initiate the peer review process.
At this stage, you can create the downloadable file formats available with your published book. See Figure 29 below for details on how to do this.
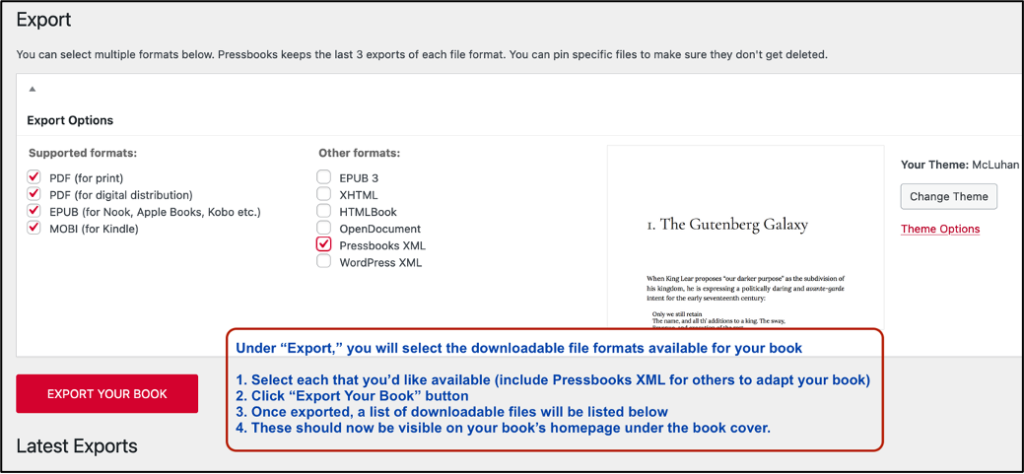
Figure 29. Export page options for downloadable files of a book once completed and ready to publish
4.10 Summary
For a more detailed guide on using and creating in Pressbooks, please consult the following section of resources.
If you have any questions or need more information about anything covered so far, your OER team at NorQuest College will be able to assist you at oer@norquest.ca.
|
Some textual descriptions in this section have been adapted from MacEwan Open Textbook Authoring Guide by MacEwan University Library licensed under a Creative Commons Attribution 4.0 International License. |
