
Teaching with Zoom for beginners
Teaching with Zoom for beginners
This tutorial will cover the following topics:
- What is Zoom — and why should I use it?
- How can I Schedule a class?
- How can I record my Zoom class?
- How do I navigate Zoom as a host?
- How can I manage students as participants?
- How can I share my screen?
- How can I use breakout rooms?
- How can I secure my Zoom session?
- How can I make a poll?
- Other considersations
- Resources
What is Zoom — and why should I use it?
Zoom is a video conferencing tool that is widely used for conferencing and delivering synchronous classes. As a U of L faculty member teaching in a given semester, you have access to your own host license (account). Your students do not need to have Zoom accounts to access your Zoom session — they only need the link you will provide. Along with providing a virtual classroom space where you can deliver lectures, share content, and create small group discussions, Zoom allows you to record each session and post this as a link students may access at a later date.
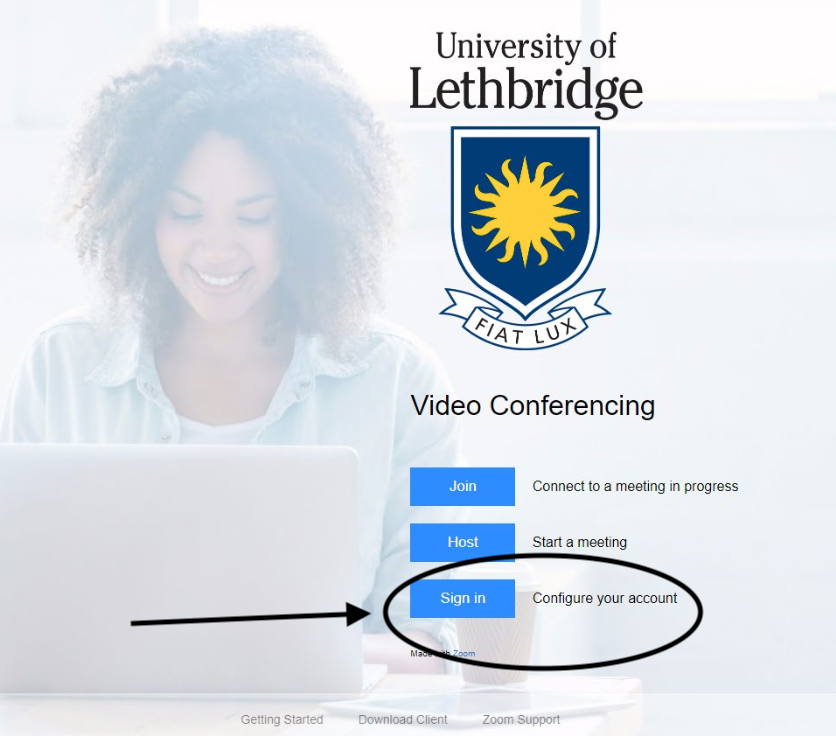
How can I schedule a class?
- If you have never been on Zoom before you will need to sign into your ULeth account at https://uleth.zoom.us with your UofL username and password.
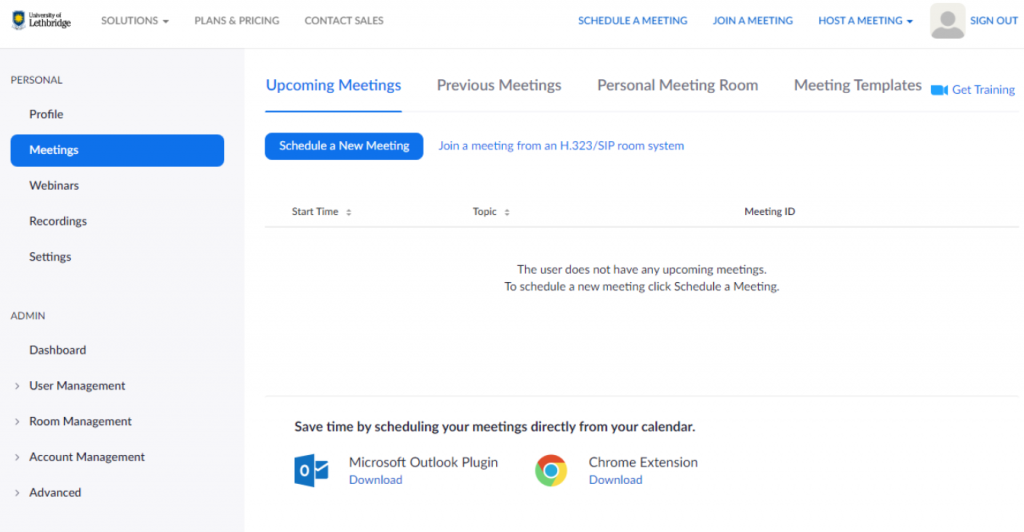
2. Once you are into your ULeth Zoom account, click on Meetings
3. Click the blue button Schedule a New Meeting
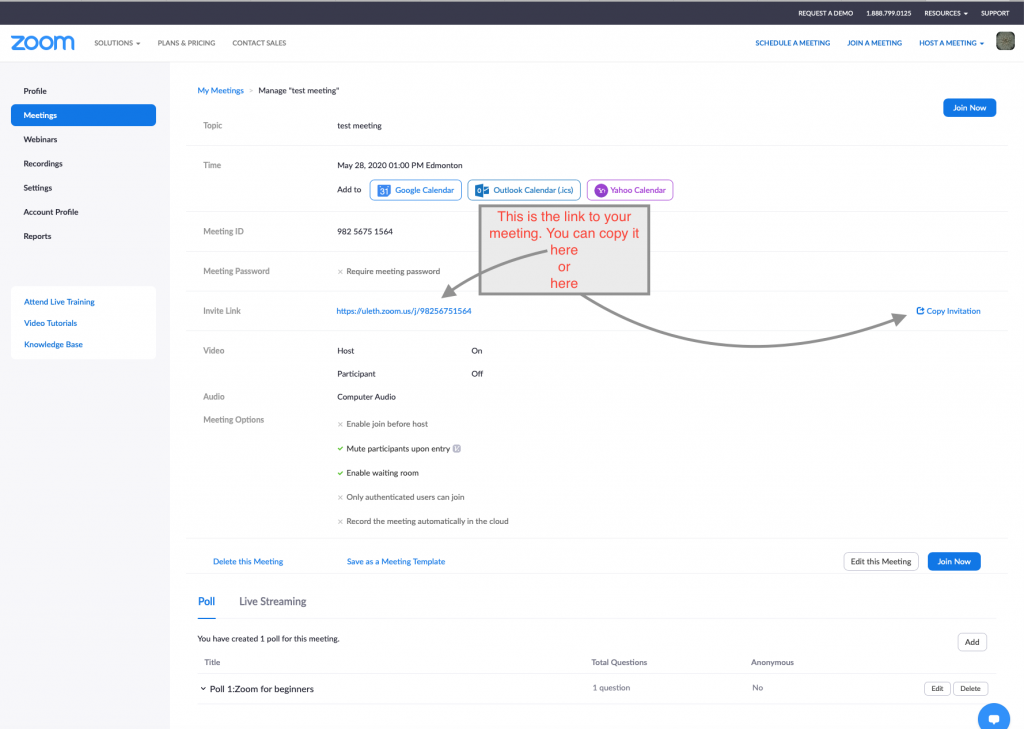
4. Once you have scheduled a meeting, you will see a screen like this:
How do I record my Zoom class?
You can record your Zoom class in a cloud location in your online Zoom account or locally on your own computer. Here is an overview of the recording feature provided by U of L IT:
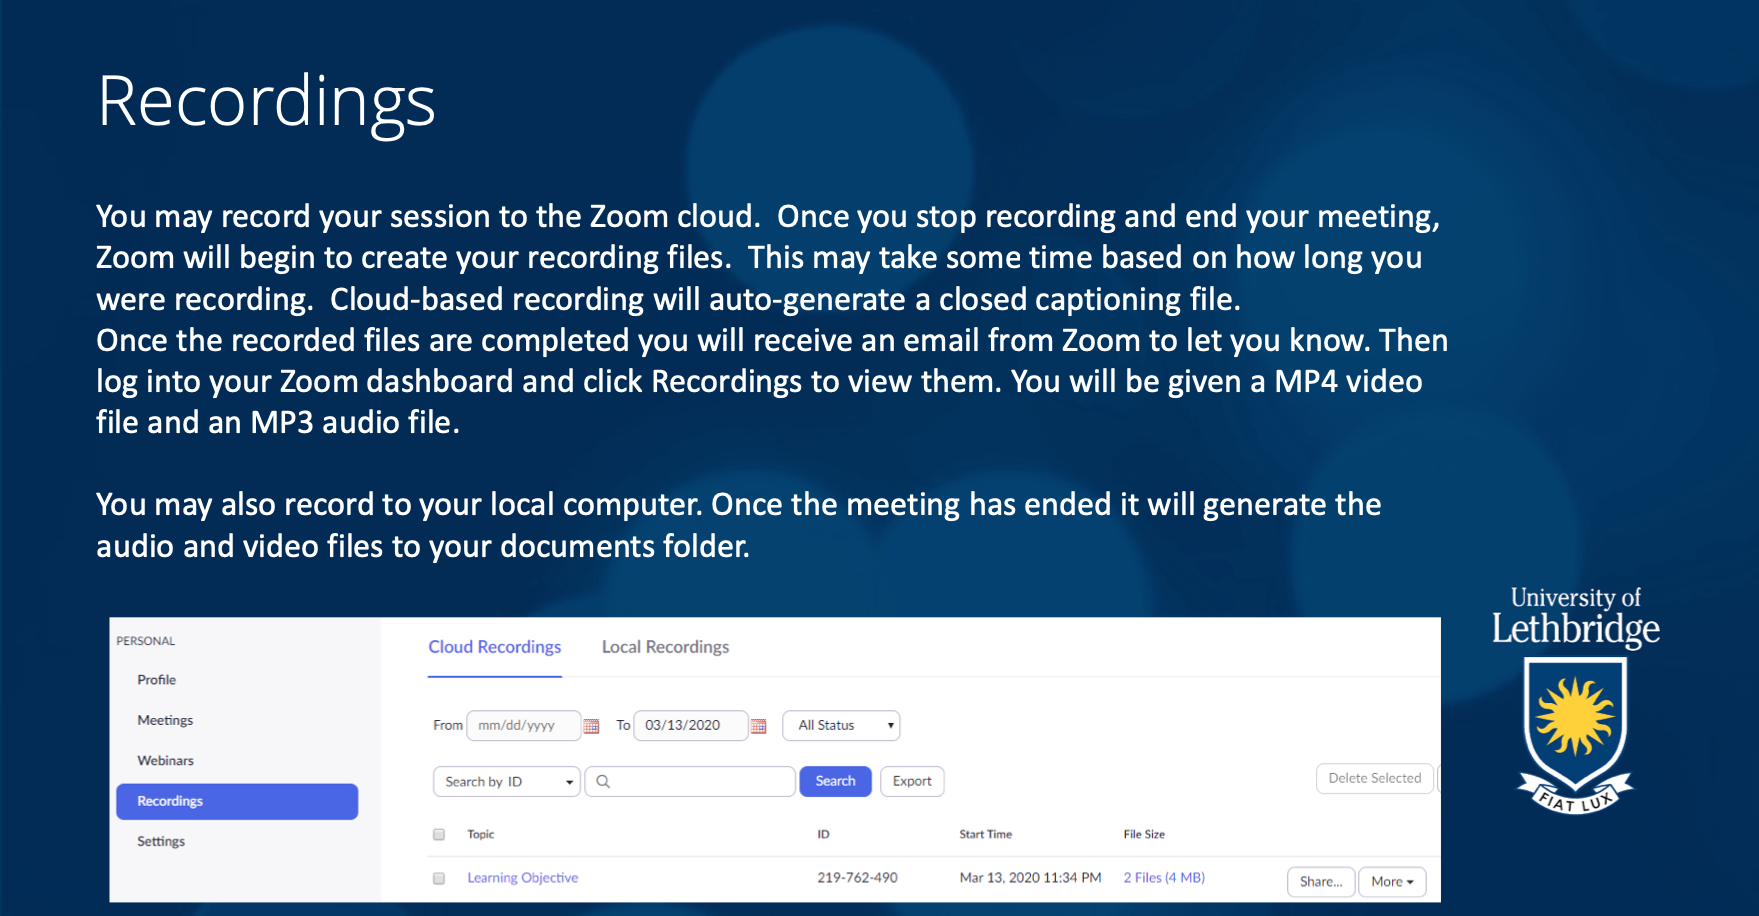
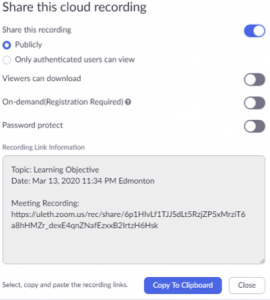
Once you have recorded the class, you can either download it to your own computer, or click on the “Share” button a new screen will open up that will provide you options for sharing:
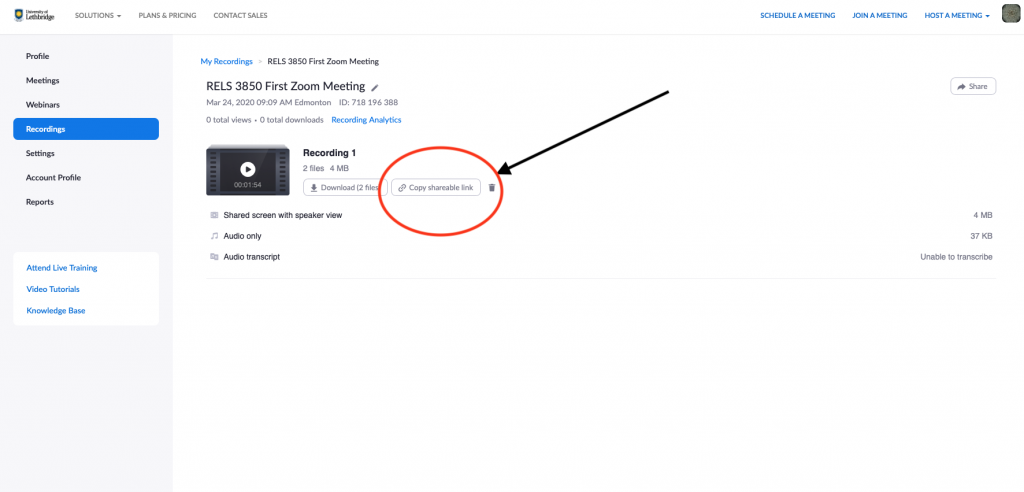
It is recommended that instead of trying to upload the whole video on Moodle, you use a weblink from your Zoom account found here when you click on the meeting in your Recordings list:
How do I navigate Zoom as a host?
Take a look at the control bar in your Zoom classroom as it appears as host:
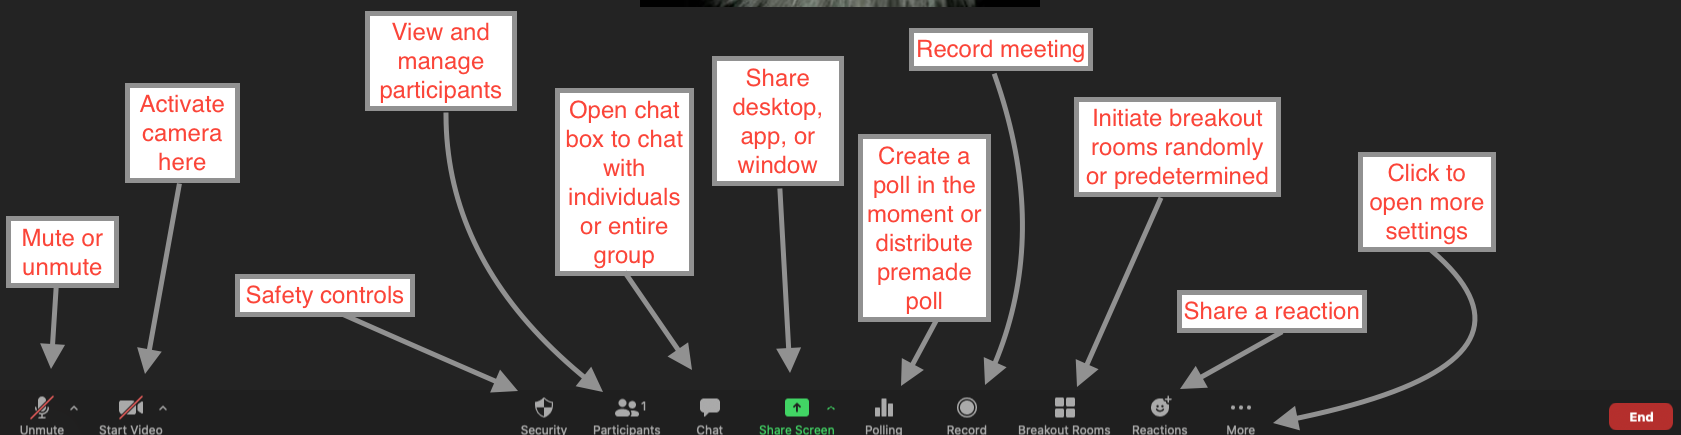
As a Zoom session host, you will have more options available to you than your participants.
Compare that to the participant control bar:

How can I manage students as participants?
The attendees in your meeting are called ‘Participants’ in Zoom. You can use different features to manage your participants.
- Click on the Manage Participants button (see image above) to open the list of participants.
- You will see a list of all your participants as in the image below. You can control what role participants have from this list. You can also mute and remove participants.
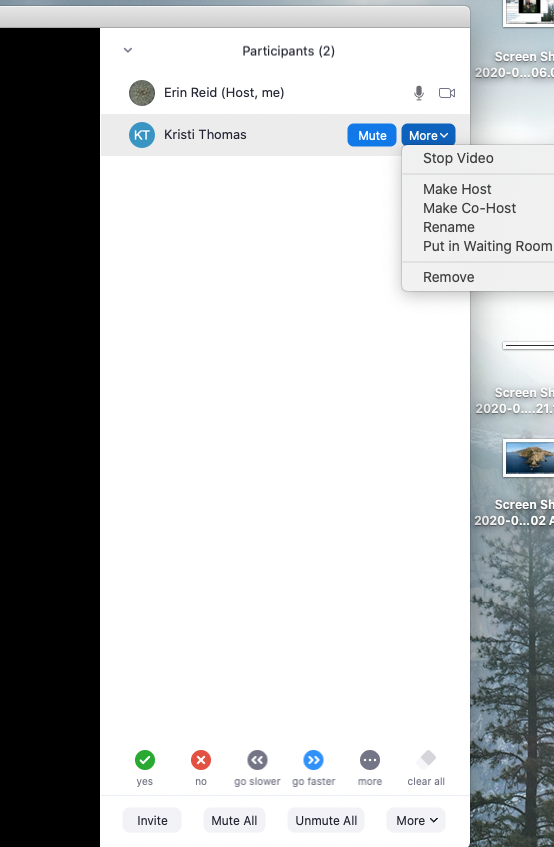
- You can choose to make one or more participants a Co-Host (unlimited number)
- A Co-host can manage participants record the meeting
- A Co-host cannot
- Stop or start the meeting
- Start closed captioning and assign someone or a third-party to provide closed captioning
- Start live streaming
- End meeting for all participants
- Make another participant a co-host
- Start breakout rooms or move participants from one breakout room to another
- Start waiting room (co-hosts can place participants in waiting room or admit/remove participants from the waiting room)
- You can tell your students to give you non-verbal feedback to indicate comprehension or to give simple answers. Click on your participants button on the control bar, and you will see a side bar open up with a list of all participants.
- They will have buttons like this to indicate their answers:

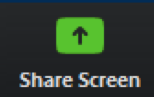
How can I share my screen?
- You can share content by clicking on the Share screen button:
2. You will see a screen like this where you can choose to share your desktop, an application, video, or a whiteboard:
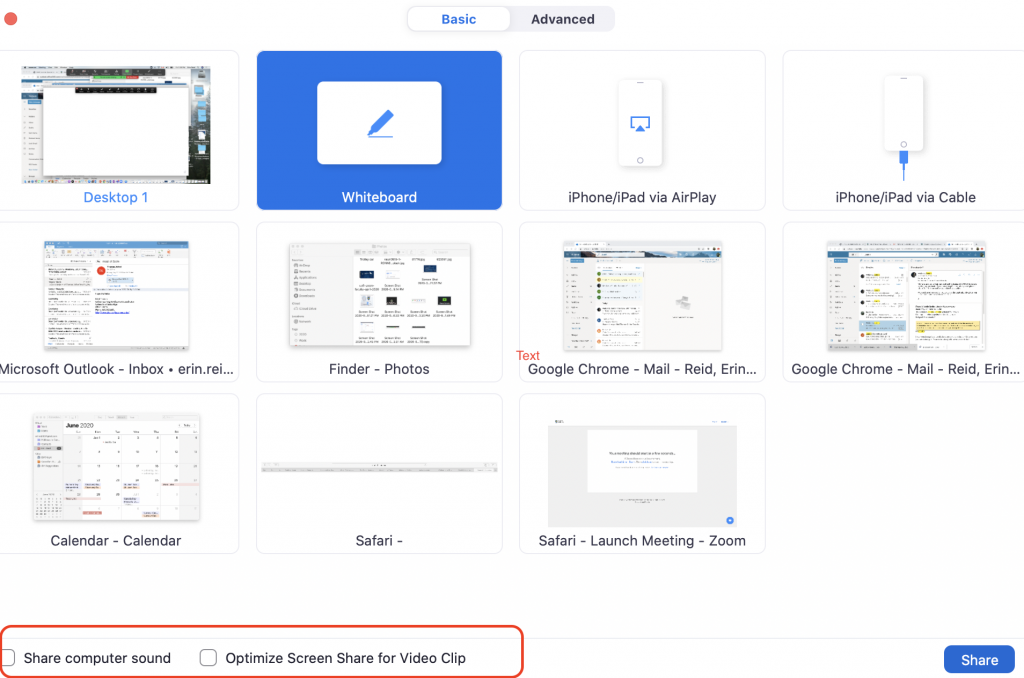
Please note that if you want to share a video, you will need to click on the buttons “Share computer sound” and “Optimize Screen Sharing for Video Clip” circled in red above.
When you are sharing your screen, you will see a new control bar at either the top or bottom of your screen that looks like this:

How can I use breakout rooms?
Creating
-
-
- You can put students into small groups easily with the breakout room button:

- You can put students into small groups easily with the breakout room button:
-
-
-
- Click on that to reveal a pop-up box that looks like this:
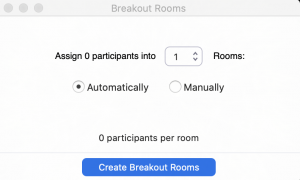
- Here you can choose the number of rooms and participants. You can do this automatically, or choose the groupings yourself by clicking on ‘Manually’
- Click on that to reveal a pop-up box that looks like this:
-
Monitoring
-
-
- Once the rooms are created, you can go into each different room to monitor or touch base with participants
- Students may ask for help in the breakout room by clicking on the ‘Ask for Help’ button which will alert you by sending you a message.

-
Issues
-
-
- Because you cannot share your materials in the breakout rooms directly, you will need to plan ahead and have these available in another location, say a document on Moodle, for example. You can provide the link in the chat box.
- Be sure to provide clear and detailed instructions before each breakout session so that students know exactly what they need to do.
- Make sure students know how to ask for help.
- Consider assigning roles to participants in each breakout room to clarify what everyone needs to accomplish.
-
How can I secure my Zoom session?
Here are some tips from U of L’s Zoom webinar created by IT:
When you click on the security button at the bottom of your screen, you’ll see these options pop-up:
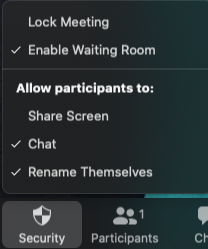
Key take-away points for security in Zoom include
- Always having the latest version of Zoom updated on your computer
- Enable waiting room
- Disable audio and video before entry
- Enable Password
- Disable chat saving for participants
- Lock the meeting using the security button on your host control bar.
How can I use the polling feature?
You can use the polling feature in Zoom to monitor student comprehension or engagement. You do this in two ways:
A) Set up a poll during your class (i.e. on the fly), or
B) Set it up before your class begins in your Zoom account.
A) Set up the poll during your class
- Click on the polling button in your control bar at the bottom of your screen:

- When you click on the polling button, you will see this pop-up screen:

- You can give your poll a name, click on ‘anonymous’ if you don’t want students to see participants’ names on the responses, and add as many questions as you like. Be sure to click ‘save’
- You can leave the poll open for as long as you like. You will be able to see how many people are filling out the poll in real time.
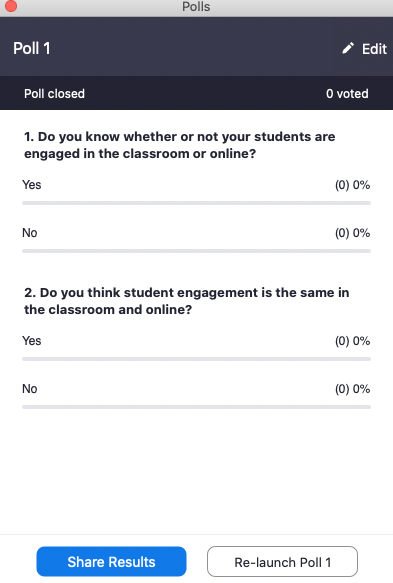
- When you are ready to close the poll, click on ‘Close poll’ and then you will have the option to share poll results with the class by clicking on ‘Share Results.’
B) Set up poll before your class begins
- You can create polls in advance so that you do not need to do this while your class is in session.
- Go to your University of Lethbridge Zoom account and sign in.

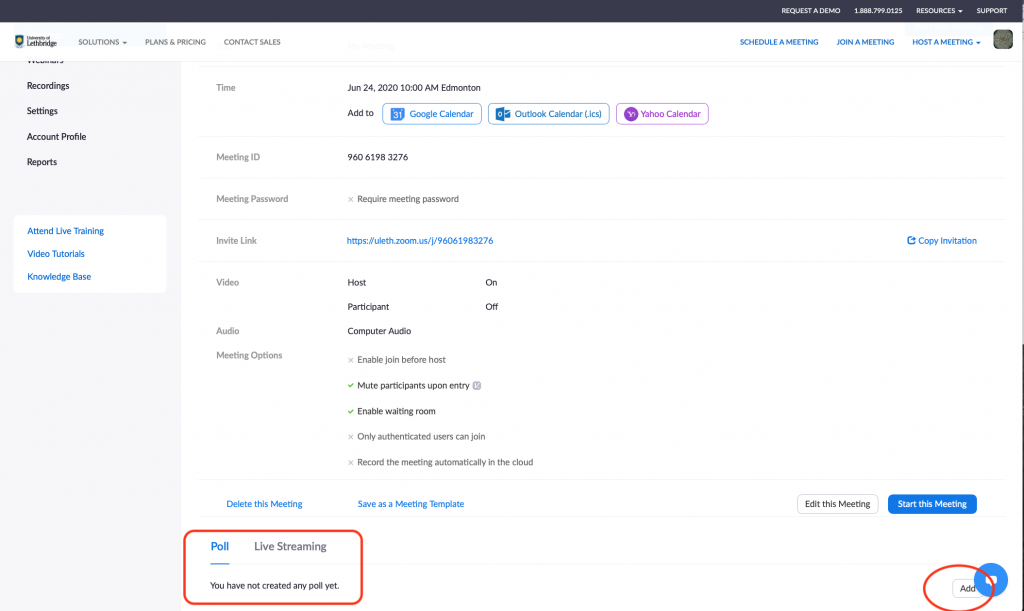
- Go to your meeting that you have created and find the ‘Poll’ button on your bottom left (red square below). In the bottom right corner, you will see an ‘Add’ button (red circle below). Click on this button and you will be brought to the same ‘Add a poll’ pop-up screen as in the first step above.
- Now your poll is created. When you begin your Zoom session, clicking on the polling feature will automatically bring up your pre-created poll for distribution in class using the steps outlined in section A.
Other considerations
-
- Virtual backgrounds
- Noise
- Make sure that you tell folks that they will show up on camera
- Consider students’ privacy concerns
Further resources
- University of Lethbridge’s Zoom tutorial in pdf developed by IT
- General support on multiple topics from Zoom
- Learn more about security and safety features of Zoom
- Tips and tricks from Zoom
Media Attributions
- Screen Shot 2020-05-26 at 1.51.21 PM
- Screen Shot 2020-05-26 at 1.49.14 PM
- Screen Shot 2020-05-28 at 2.52.45 PM
- Screen Shot 2020-06-01 at 1.15.49 PM
- Screen Shot 2020-06-01 at 1.19.29 PM
- Screen Shot 2020-06-01 at 1.24.57 PM
- Screen Shot 2020-05-28 at 1.26.32 PM
- Screen Shot 2020-05-29 at 11.12.25 AM[1] copy
- Screen Shot 2020-05-29 at 11.06.06 AM
- Screen Shot 2020-05-28 at 1.53.20 PM
- Screen Shot 2020-05-28 at 2.41.49 PM
- Screen Shot 2020-05-29 at 1.38.49 PM
- Screen Shot 2020-05-29 at 10.53.51 AM
- Screen Shot 2020-05-28 at 1.21.17 PM
- Screen Shot 2020-05-29 at 1.43.27 PM
- Screen Shot 2020-05-26 at 1.21.32 PM
- Screen Shot 2020-06-02 at 10.16.36 AM
- Navigation Bar
- Add a Poll
- Share Results
- Screen Shot 2020-06-11 at 1.42.44 PM
